DAIRY-FREE YOGURT REVIEW

THE GOOD, THE BAD, & THE UGLY (faces) of Dairy-Free Yogurt!

This video is my honest review of 9 dairy-free yogurts found in popular grocery stores. Some are winners - some are definitely losers!

Below is a list of the yogurts with their time stamp in the video in case you're interested in one in particular. :) 

*Good Karma Vanilla Dairy-Free Yogurt: 0:47

*Forager Project Creamy Dairy-Free Cashewgurt in Vanilla Bean: 1:58

*Kite Hill Artisan Almond Milk Yogurt in Vanilla: 2:54

*Daiya Strawberry Dairy & Soy Free Greek Yogurt: 4:10

*Stonyfield Organic Dairy Free Yogurt in Vanilla: 5:24

*So Delicious Coconut Milk Vanilla Cultured Yogurt Alternative: 6:19

*So Delicious Coconut Milk Plain Yogurt Alternative: 7:22

*Silk Vanilla Almond Dairy-Free Yogurt Alternative: 8:52

*Silk Vanilla Soy Dairy-Free Yogurt Alternative: 10:02

Enjoy!!

CENTERED Emily Sig 1200x200 copy.png
FOR WEBSITE Dairy Free YouTube Thumbnail.png

LEMON CAULIFLOWER RICE

I LOVE rice and pasta, but having a delicious low-carb alternative is always a good idea. No, riced cauliflower doesn’t taste like rice, but it is delicious and the consistency satisfies my carb cravings. Add this as a side to a lean protein and some leafy greens and you’ve got yourself a healthy, tasty meal!  

Difficulty Level: Easy

Cook Time: 10-15 minutes

Serving Size: 3

What You’ll Need:

  • 1 pound riced cauliflower (I used the pre-chopped version from Trader Joe’s, but you could chop a whole cauliflower if you’d like)
  • ½ yellow onion, chopped
  • ½ lemon, sliced
  • 1 tbsp olive oil
  • ¼ cup water
  • Salt, pepper, and garlic salt

Here’s How:

  1. Drizzle 1 tbsp olive oil into a pan on medium heat. Let the oil warm for ~1-2 minutes.
  2. Add chopped onion to the pan and cook until onion edges begin to brown.
  3. Mix in riced cauliflower and reduce to low heat.
  4. Add ¼ cup water and cover with lid.
  5. Let simmer until cauliflower pieces begin to soften, stirring every 1-2 minutes.
  6. Once cauliflower is softened (not completely soft, but soft enough to not be crunchy), remove from heat.
  7. Squeeze lemon over cauliflower and add salt, pepper, and garlic salt to taste.
  8. Stir and serve!

Show me how you serve up your dish of Lemon Cauliflower Rice by using the hashtag #HMBgirl on Instagram. Enjoy!

Onion in Pan.png
Finished Cauli.png

TURKEY & VEGGIE EGG MUFFINS 

Turkey Egg Muffin Banner 2.png

These are quickly becoming my favorite kind of muffin…

OK, not only are these Turkey Egg Muffins delicious – they’ve got even more protein than my original Savory Egg Muffins. Simple, great for meal prep, easy to grab on-the-go…what more could you ask for?!  

I like to make about 12 muffins at a time, stick them in the fridge, and eat 2-3 at a time throughout the week. I hope you love them as much as I do!

Difficulty Level: Easy

Cook Time: 25 minutes

Serving Size: 12 muffins

What You'll Need:

  • 12 extra large eggs (I use 6 whole eggs & 6 egg whites only)

  • 1/3-pound organic ground turkey

  • Veggies of your choice. You'll need enough to fill the bottom of each cup in the muffin tin. I used tomatoes and eggplant

  • Drizzle of avocado oil (or oil of your choice) to grill the turkey

  • Spices & herbs of your choice (I like rosemary, garlic salt & pepper)

  • Girl, make life easy and get some muffin tin cups. These will save SO much time in the clean-up process.

Here's How:

  1. Preheat oven to 350 degrees Fahrenheit.

  2. Place cups in the muffin tin.

  3. Chop vegetables and place in the bottom of each cup of the muffin tin. 

  4. Heat avocado oil in pan over medium heat. Add turkey and grill until mostly cooked with just a little pink color left.

  5. Place nearly-cooked turkey in each cup of the muffin tin with the veggies.

  6. Crack 12 eggs into a bowl & stir using a fork or whisk. I used 1/2 whole eggs, 1/2 egg whites only.

  7. Mix your choice of spices & herbs in with the eggs.

  8. Pour eggs into muffin cups until each cup is about 3/4 full.

  9. Place muffin tin in the oven & bake for 20-25 min. 

  10. Remove muffins from the oven & let cool for ~5 min.

  11. Serve or refrigerate for up to a week. I recommend heating these before you eat them.

Turkey_Thumbnail.png
Veggies.png
Dry_Ingredients.png
All_Ingredients.png

Let me see your version of these! Be sure to post them to Insta using the hashtag #HMBgirl. Enjoy!

emily signature.png
SITE - Egg Muffin Banner 1.png

Roasted Purple Sweet potatoes

SITE_-_Banner_for_Site_-_Purple_Sweet_Potatoes.png
 

literally. obsessed. 

Purple sweet potatoes have quickly become a staple in my meal prep because of their taste (YUM!) and nutritional properties. Also known as Okinawan sweet potatoes, they possess the benefits of regular sweet potatoes AND are packed with antioxidants.

Fair warning – these don’t taste like your typical sweet potatoes, but I actually like them better! Play around with your choices of seasonings to see what you like best. I prefer a little dried rosemary, garlic salt, and ground pepper. Also, I bake these in bulk to have on hand throughout the week, so this recipe is geared toward that. If you’re only making one or two potatoes, you’ll want to decrease the bake time.

Difficulty Level: Easy

Cook Time: ~30 - 40 minutes

Serving Size: As many as you want (I usually cook 5-8 potatoes at a time for meal prep)

What You'll Need:

  • Purple sweet potatoes (as many as you choose)
  • Coconut oil spray (or another oil spray of your choice)
  • Spices & herbs of your choice (my faves are rosemary, garlic salt & pepper)

Here's How:

  1. Preheat oven to 400 degrees Fahrenheit.
  2. Chop sweet potatoes into strips about ¼ - ½ inch thick & 2 – 3 inches long. These potatoes are oddly shaped, so some strips won’t be perfect.
  3. Spray baking sheet with a light layer of coconut oil. If not using an oil spray, wipe a very light layer of oil on the baking sheet. Too much oil = soggy taters.
  4. Place potatoes on baking sheet – do not stack potatoes (the potatoes in the picture where thrown onto one sheet after being baked on multiple baking sheets).
  5. Bake for ~30 – 40 minutes or until soft in the middle & a little crispy on the outside. Flip potatoes about halfway through cook time.
  6. Remove from oven, cool & serve!  
 
CENTERED_Emily_Sig_1200x200_copy.png
INSTA - Purple Sweet Potatoes.png

almond crusted chicken & lemon zoodles

Almond Crusted Chicken Banner 2.png
 

This is a super nutritious version of one of my favorite childhood meals…

I love pasta. I love bread. I love chicken covered in breadcrumbs on top of pasta.

But...my body does NOT love these items. So, this dish is the perfect substitute. In fact, I think I actually prefer the almond crusted chicken to breaded chicken – no joke. Plus, this dish looks impressive without actually requiring much skill or effort.

Zucchini noodles (or zoodles, as I lovingly call them) do not make for a good meal prep item because they don’t reheat well, so I usually make only as much as I will immediately need and save any raw zoodles for another time. In this recipe, I use the portions for when I’m making this for just me, so you can multiply the ingredients by however many people you’re serving.

Difficulty Level: Not quite easy but still pretty darn straightforward

Prep Time: 10 minutes

Cook Time: 20 minutes

Serving Size: 1

What You'll Need:

  • 1 organic chicken breast
  • 2 small zucchini (or 1 larger zucchini; I also use yellow squash)
  • Spiralizer (I got mine from Target)
  • Drizzle of avocado oil (or oil of your choice) to grill the chicken & zoodles
  • 1 egg white
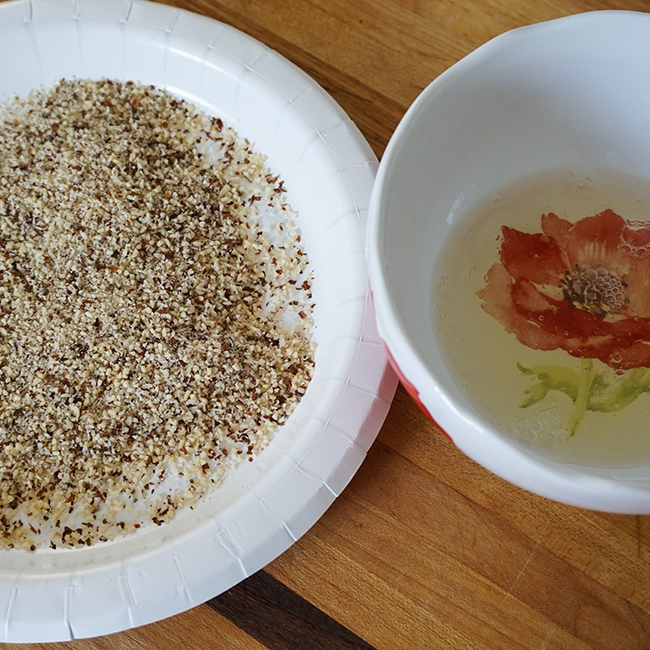
  • ¼ cup almond meal (do yourself a favor & buy the almond meal – trust me that crushing almonds on your own is not as fun as it seems)
  • ½ fresh lemon
  • Spices & herbs of your choice (I like rosemary, garlic salt & pepper)

Here's How:

  1. Use your spiralizer to make raw zucchini noodles. Set aside.
  2. Crack one egg white into a bowl & stir vigorously with a fork.
  3. Dip chicken breast into bowl to coat entire breast in egg.
  4. Immediately dip chicken breast into almond meal + any spices/herbs you would like. Be sure to thoroughly coat entire breast.
  5. Heat a drizzle of avocado oil in pan on medium heat.
  6. Place coated chicken breast in pan and cook on each side for 5-7 minutes, or until cooked all the way through.
  7. Remove chicken from heat and set aside.
  8. Add another drizzle of avocado oil to the pan & add the raw zoodles over medium heat.
  9. Squeeze lemon juice on top of zoodles & add any spices/herbs you’d like.
  10. Stir zoodles regularly & cook for about 2 – 2.5 minutes. They should maintain their color & just get a little softer.
  11. Remove zoodles from stove.
  12. Place zoodles and chicken breast onto plate and serve.
 
Spiralizer.png
Raw Almonds.png
Frying Chicken.png
Raw Chicken.png
Zuchinni.png
 

I’d love to see how you impress your next dinner guests with this delicious dish! Be sure to use the hashtag #HMBgirl when you post to Insta so I can see & show some love! xx

CENTERED Emily Sig 1200x200 copy.png
 
Almond Crusted Chicken Banner 2.png

ROSEMARY ALMONDS

SITE - Almonds  (1 of 1).jpg
 

THIS RECIPE IS THE PERFECT SNACK!

I know almonds are good for me, but for some reason I rarely choose whole, raw almonds when looking for a little snackaroo. NOT ANYMORE! Rosemary almonds seriously take these healthy little nuts to the next level. Eat them as your own personal snack or impress your pals by putting them out at a get together (just keep napkins handy because olive oil). 

Difficulty Level: Is there an easier than easy level?

Cook Time: 2 minutes

Serving Size: as much as you want/need

What You’ll Need:

  • Raw Almonds
  • Olive Oil
  • Dry Rosemary
  • Black Pepper
  • Pink Himalayan Sea Salt 
  • Red Pepper Flakes (if you're OK with a bit of a kick)

Here’s How:

  • Mix all of the dry ingredients together. I eyeball everything. 
  • Drizzle just a bit of olive oil on top. Nothing worse than that weird "too-much-olive-oil taste" (but keep in mind you can always add more almonds).
  • Stir, taste and add in more of any ingredient as desired. 

Hope these turn your almond-eating experience upside down! I'd love to know what you think, so be sure to tag #HMBgirl when you post your version of these babies to Insta. xx

CENTERED Emily Sig 1200x200 copy.png
 
Thumbnail - Rosemary Almonds.png

tomato, eggplant & turkey dinner

i HAVE A NEW OBSESSION!! 

This Tomato, Eggplant & Turkey dish is not only delicious - it's also low-calorie and packed with protein! My mom used to make something kind of similar when I was a kid, so this is an adapted version. It's great as a stand-alone dinner and tastes just as good when heated up for meal prep. Plus, it's pretty simple to make.

Difficulty Level: Easy

Cook Time: 25 minutes

Serving Size: ~8 - the serving size is what I use for meal prep. If you want to make this for just one meal, use half the amount of ingredients

What You'll Need:

  • 2 pounds organic ground turkey
  • About 4 large Roma tomatoes (sometimes I use 5), diced
  • 1/2 yellow onion, diced
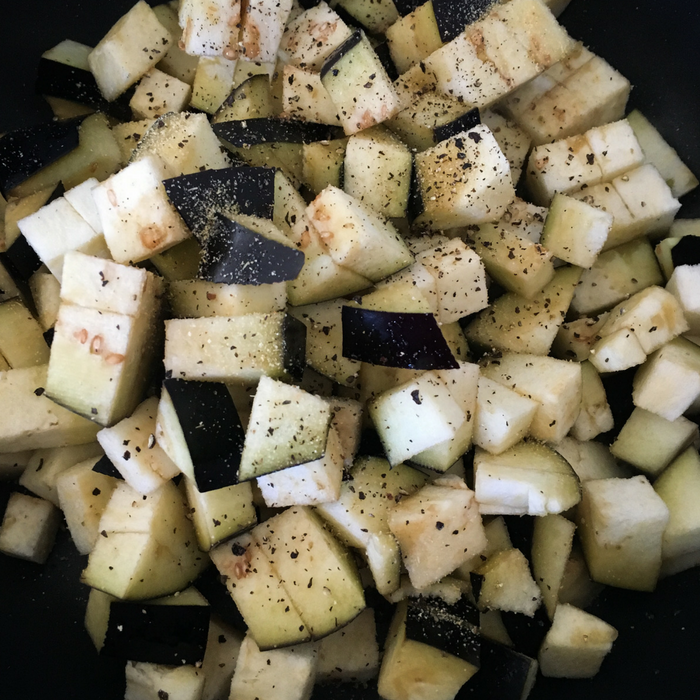
  • 1 medium eggplant, diced into 1/2-inch thick cubes
  • 3-4 cloves garlic, minced (I use 2-3 cloves of elephant garlic when I have it; the more garlic, the merrier)
  • Olive oil (I just drizzle it in the pan when cooking each set of ingredients)
  • Salt & pepper to taste
Eggplant.png
Turkey.png
Garlic.png

Here's How:

  1. Preheat oven to 375 degrees Fahrenheit
  2. Drizzle olive oil into a nontick skillet
  3. Add onion and garlic to pan, saute until soft
  4. Move onion & garlic to nonstick baking pan
  5. Repeat steps 2-4 with eggplant; saute until a little soft and darker in color
  6. Repeat steps 2-4 with turkey meat; saute until there is barely any pink color left (the turkey in the image below still requires more cooking)
  7. Combine tomatoes with onion, garlic, eggplant and turkey in nonstick baking pan
  8. Feel free to add salt & pepper at this point (I do it now and after baking)
  9. Stir all ingredients together
  10. Bake for 10 minutes (if turkey is still at all pink, bake for a few more minutes until it is brown)
  11. Let cool and serve

I hope you love this recipe as much as I do! Be sure to use the hashtag #HMBgirl when you post to Insta so I can see your version of this delicious dish!

Turkey Thumbnail.png

FRIED EGG SALAD


I STUMBLED UPON THIS ONE AND, WOW, I’M IN LOVE.

I love a good fried egg, especially with runny delicious yolk, but I was a bit hesitant to mix the eggy yolky goodness with my greens. I can officially say that I am SO glad I did. This recipe is so easy, so healthy, and so YUM!

Difficulty Level: Easy (Whats easier than easy?)

Cook Time: ~5-10 minutes

Serving Size: 1 (but easy to make for more)

What You'll Need:

  • 1 or 2 large eggs
  • 1 bowl of lettuce of your choice (I used Trader Joe’s microgreens and spicy spinach blend)
  • 2 tsp. olive oil or coconut oil per egg
  • Salad dressing of your choice (I used an Italian recipe that I’ll eventually share)
  • Salt, garlic salt & pepper to taste

Here's How:

  1. Place non-stick pan over medium heat and add 2 tsp. of olive or coconut oil.
  2. Crack 1 egg into pan and let cook for 1-2 minutes. The egg white should be a little bubbly and still a little transparent before you flip the egg.
  3. Flip egg and let cook for 1-2 minutes. Egg whites should be completely white, but yolk should feel soft to the touch.
  4. Repeat with another egg, if desired.
  5. While egg is cooking, rinse lettuce of your choice, pat dry with a paper towel, and place in bowl.
  6. Place fried eggs on top of lettuce and season as desired. I used a bit of Pink Himalayan Sea Salt, garlic salt, cracked pepper, and salad dressing.
  7. Use fork to cut egg so that the yolky goodness mixes with the lettuce.
  8. Dig in!

This dish is my go-to for a quick and healthy lunch! I hope you love it as much as I do. And fun fact the colors of the egg and lettuce make this meal totally Instagram-able. Share your meal with me using the hashtag #HMBgirl so I can oodle over your Fried Egg Salad. Happy healthy eating!


Fried Egg Salad.png

ROASTED VEGGIE TRAY

Having healthy meal options readily available is KEY to feeling your best and being able to perform at your best level (in exercise, sports, and life in general!). That's why I'm semi-obsessed with this delicious Roasted Veggie Tray.

What You'll Need:

  • 1 tbsp olive oil or coconut oil - I used this amount for a FULL tray of veggies. Adjust amount based on the amount of veggies you use
  • Veggies of your choice - I chose zucchini, broccoli, cauliflower, purple onion, & green onion for this featured tray
  • GARLIC! As much or as little as you'd like - I used a whole bulb and just chopped the cloves in half
  • Seasonings of your choice - try to steer clear of salts; I used cumin, black pepper, red pepper flakes, parsley, rosemary, fennel seeds, oregano, & a dash of cayenne pepper

Here's How:

  • Preheat your oven to 450 degrees Fahrenheit
  • Chop all veggies & garlic to their desired sizes and place on a baking pan
  • Drizzle your choice of oil on top, then use your fingers to mix veggies around to equally distribute the oil 
  • Add your seasoning & mix the veggies again (you can also do this by placing all veggies in a bag with the oil & seasoning before putting them on the pan)
  • I baked mine at 450 for 10 minutes, then mixed the veggies on the pan, then baked at 385 for 12 minutes. The temperature & bake time will depend on the veggies you chose & your preference for how cooked you want the veggies to be, so feel free to stray from my recommendation if you prefer!!
  • Remove veggies from oven and let cool. Serve or pack them for your meal prep.

I like to divide a packed tray like this into 5-7 portions that I'll eat throughout the week. And I can't wait to try other veggies, like bell pepper and yellow squash. It's so delicious, so simple - the perfect way to EAT. YO. VEGGIES.

Hope you love this one! Post to Insta using the hashtag #HMBgirl so I can scope out your masterpiece. :)

Veggies 3.png

TOMATO BASIL FARRO


THIS RECIPE MADE ME FALL IN LOVE WITH FARRO!

Simple, healthy, delicious - and it's a nice alternative to pasta or rice. I use this as a side for my meal preps or as a stand-alone dish with some chicken thrown in!

Difficulty Level: Easy

Cook Time: 15 minutes

Serving Size: ~5 (use less if you're cooking for fewer or not meal prepping)

What You'll Need:

  • 1.5 cups of your favorite brand of farro. I used Trader Joe's 10-Minute Farro because who doesn't have 10 min?!
  • 2 cups fresh basil
  • 1  cup cherry tomatoes (though any tomato will do)
  • 1 can pitted sliced black olives
  • 1 fresh lemon
  • Olive oil to drizzle
  • Salt & pepper to taste

Here's How:

  1. Follow the instructions to boil your farro. If you're using TJ's 10-Minute Farro, this will take 10 minutes + time for the water to boil.
  2. While the farro is cooking, chop basil, tomatoes, & olives. 
  3. "Zest" the lemon - I use a cheese grater for this. 
  4. Combine farro, basil, tomato, olives, and lemon zest in a bowl.
  5. Squeeze juice of 1/4 lemon into the mixture.
  6. Add a drizzle of olive oil and sprinkle of salt and pepper to taste.
  7. And that's it!!! 

I hope you enjoy this tasty take on farro. Be sure to snap a pic of your meal to share with me on Instagram using the hashtag #HMBgirl. Enjoy!

 
Tomato Basil Farro Cover (1 of 1).jpg

SAVORY EGG MUFFINS

I can't believe i lived almost 28 years without these in my life.

These are packed with protein & other nutrients, they're light & fluffy, & they're a breeze to make. Breakfast will never be the same. 

Before we go further, I want to let you know that I got the idea for this recipe from my dear friend, Heidi. And then I got the baking instructions from this POPSUGAR recipe, which is adapted from someone else. You get the idea...this one came from a lot of great minds.

Difficulty Level: Easy

Cook Time: 25 minutes

Serving Size: 12 muffins

What You'll Need:

  • 12 extra large eggs (I use 6 whole eggs & 6 egg whites only)
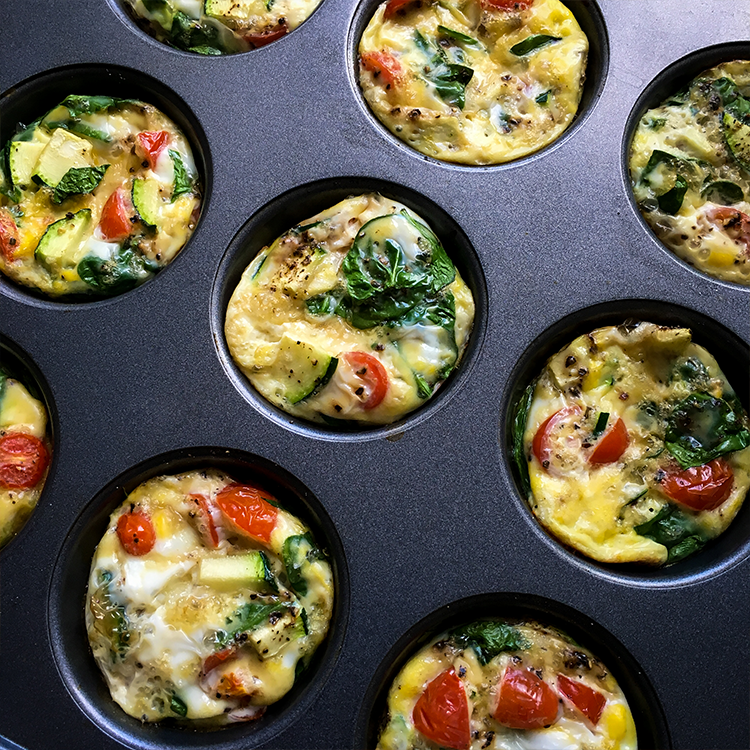
  • Veggies of your choice. You'll need enough to fill the bottom of each cup in the muffin tin. I used tomatoes, zucchini, & spinach here
  • Spices & herbs of your choice
  • Olive oil, coconut oil, or vegan butter to grease the muffin tin

Here's How:

  1. Preheat oven to 350 degrees Fahrenheit.
  2. Grease the muffin tin.
  3. Chop vegetables and place in the bottom of each cup of the muffin tin. 
  4. Crack 12 eggs into a bowl & stir using a fork or whisk. I used 1/2 whole eggs, 1/2 egg whites only.
  5. Mix your choice of spices & herbs in with the eggs.
  6. Pour eggs into muffin cups until each cup is about 3/4 full.
  7. Place muffin tin in the oven & bake for 20-25 min. 
  8. Remove muffins from the oven & let cool for ~5 min.
  9. Use a small spatula or knife to remove muffins from tin.
  10. Serve or refrigerate for up to a week. I recommend heating these before you eat them.

And guys - it's that simple!! You can get as creative as you want with your ingredients. Be sure to snap a pic of your meal to share with me on Instagram using the hashtag #HMBgirl. Enjoy!

Egg Muffin 5.png

SPINACH ZUCCHINI SALAD


This is an amazingly delicious salad variation! You can add other veggies or chicken, or eat it as is. It’s healthy, fresh, and a definite crowd-pleaser.

Difficulty Level: Intermediate (only because it’s easy to overcook the zucchini)

Cook Time: 10-15 minutes

Serving Size: 1-2

What You’ll Need:

  • 1 bowl of fresh spinach
  • 1 medium-sized zucchini
  • Raw sliced almonds to sprinkle on top
  • Feta cheese to sprinkle on top
  • Salad dressing of your choice (I use a light Italian dressing)
  • Salt and pepper to taste

Here’s How:

  1. Use a cheese grater to slice zucchini into thin long ribbons. You can also cut strips with a knife, but it will be harder.
  2. Once you’ve sliced the zucchini to the point where it’s no longer easy to cut without getting your fingers in the way, safe remaining zucchini for another meal.
  3. Cook the zucchini slices – I place mine next to each other on a George Foreman grill, but you can also use any other grill.
  4. Once zucchini has softened and browned a bit, remove from grill and place on top of a bowl of spinach.
  5. As an option, place sliced almonds in a pan over medium heat to toast. Remove from pan when they have browned slightly.
  6. Add almonds and crumble feta cheese over spinach & zucchini.
  7. Season with salt, pepper, and your choice of salad dressing.
  8. That’s it!

I must tell you that I prefer this salad when the zucchini is still warm, so I don’t use this one when I meal prep. The combo of warm zucchini and spinach is amazing, so enjoy!!

Be sure to share a pic of your version of this dish with me on Instagram! Use the hashtag #HMBgirl so I can take a peak.

Happy nomming!

 
Spinach Zucchini Salad.jpg

ROASTED COCONUT ASPARAGUS & BRUSSELS SPROUTS


I LOVE THIS SWEET & SALTY SIDE OF TWO OF MY FAVORITE VEGGIES!

Roasted coconut asparagus & brussels sprouts is one of my all-time favorite sides for a stand-alone meal or to prep for the week. I can’t wait for you to try this!!

Difficulty Level: Easy

Cook Time: 20-25 minutes

Serving Size: ~4 (depending on how hungry you are! J)

What You'll Need:

  •  1 bunch of asparagus
  • 16 oz brussels sprouts (or 1 bag from Trader Joe’s)
  • 1.5 tbsp organic virgin coconut oil
  • Salt, garlic salt & pepper to taste

Here's How:

  1. Preheat oven to 400 degrees F.
  2. Trim the dry, white ends off of the asparagus.  Chop a small amount of the end from your brussels and remove the outer layer of leaves. Slice each brussel in half.
  3. Spread asparagus and brussels sprouts onto a baking sheet.
  4. Melt 1.5 tbsp organic virgin coconut oil until it is completely liquid. 45 seconds in the microwave usually works for me.
  5. Drizzle the coconut oil over the asparagus and brussels sprouts.
  6. Lightly sprinkle everything with salt, pepper and garlic salt.
  7. Using a spatula, mix all ingredients so the seasonings and oil are equally distributed.
  8. Place baking sheet in oven for 10-12 minutes.
  9. Remove sheet from oven and use spatula to mix everything on more time.
  10. Place baking sheet in over for another 10-12 minutes.
  11. You will know your dish is ready when some of the brussels sprout leaves are light brown and crispy and when brussels and asparagus are soft to the touch.
  12. Remove sheet from oven, let cool and enjoy! 

Show me your brussels sprouts and asparagus perfection! Be sure to take a pic of your meal to share with me on Instagram using the hashtag #HMBgirl. Happy healthy eating!

 
Brussels.Asparagus.png

PERFECT HARDBOILED EGGS EVERY TIME! 

USE THIS Hardboiled Eggs.png

Hardboiled eggs are a staple in my diet because of their nutritional value – they’re high in protein (and they contain complete protein), potassium, Vitamin D & Vitamin B-12. Plus, they’re easy to take on-the-go.

That said, an under- or over-cooked hardboiled egg drives me nuts! After numerous trials, I’ve found a strategy that yields perfect hardboiled eggs – every time.

Difficulty Level: Easy

Cook Time: 8 minutes + 10 minutes of cooling time

Serving Size: You choose! I usually make hardboiled eggs with 10-12 eggs at a time.

What You’ll Need:

  • Large eggs
  • 1 large pot filled halfway with water
  • A pin or other sharp small utensil

Here’s How:

  1. On medium heat, bring water to a moderate boil (more than a simmer but less than a full-blown “this water is going to evaporate” boil)
  2. Use pin or other utensil to punch a small hole in each egg
  3. Place eggs in boiling water for 8 minutes
  4. Turn off heat and leave eggs in water for ~10 minutes
  5. Remove eggs from water and store
  6. If eating immediately after, place eggs in cold water for a couple minutes or let air-cool for several minutes. 

Please keep in mind that you may need to adjust your boiling time based on the altitude of your kitchen. I live close to sea-level, so if you live at a higher elevation, you may need to extend your boiling time by a few minutes.

After taking photos for this post, I upgraded my hole-punching device to a “Fox Run Egg Piercer Carded.” It was less than $5 on Amazon. I’ve been pleased with the results so far and have enjoyed not needing to clean a pin or keep one around my kitchen.

I hope this post makes hardboiling eggs as easy for you as it has been for me! Let me know how it works for you by using the hashtag #HMBgirl on Instagram.

Now go get your protein on! :) 

Eggs 2.png

KALE, CHICKEN & CRANBERRY SALAD


NEW FAVORITE LUNCH ALERT!

I love a good salad, but meal prepping with one can be tricky. Will I really want this in 5 days? Is this going to satisfy my otherwise sugar/carb-focused appetite?

Fortunately, this salad does the trick! The chicken & nuts keep me full & satisfied, the brussels and kale make this salad feel fresh, & the cranberries make it just a teeeeensy bit sweet. I made five salads so my weekday lunches were taken care of, but you can change the batch size to whatever will be best for you! 

Difficulty Level: Easy

Cook Time: Like, 10 minutes

Serving Size: as much as you want/need

What You’ll Need:

  • Organic Kale
  • Chicken Breast (cooked however you would like – I roasted mine with garlic salt & pepper)
  • Raw Walnuts
  • Raw Sliced Almonds
  • Chopped Raw Brussels Sprouts
  • Dried Cranberry

Here’s How:

  • Literally, just mix everything together!
  • I used one palm-sized portion of roasted chicken breast, three palm-sized portions of kale, and one palm-sized portion of raw brussels sprouts. I
  •  tossed in a couple pinches of raw almonds, raw walnuts and dried cranberries.
  • Drizzle on an oil-based dressing of your choice (I recommend something with mustard!). Be sure to add salad dressing within a few hours before eating this, rather than when you initially put it together.

I would love to see your version of this! Share with me using the hashtag #HMBgirl so I can show your meal prep some love. Enjoy!!
 
Insta - Kale Salad.png